Setting Trigger Offset (Base-Timing)
If you are using an OEM trigger and sensor, please, initially note that:
- ST170/Zetec/Duratec (and Ford Engines with a stock sensor) will usually run a 36-1 crank trigger, and require either 75 or 255 as their offset depending how the coils are wired.
- Vauxhall XE/VW/BMW/Peugeot, Fiat and other engines using a stock 60-2 trigger will require an offset of 98 or 278 depending how the coils are wired.
Base-maps for the Plug-In Range already have their settings correct for other engines such as Mazda MX5s, Toyota, Clio etc. All engine need to have their CAS/base-timing checked, follow the guide below.
If you are using an after-market trigger wheel, or an engine with a moveable sensor position (such as the MX5 Mk1 with its CAS sensor) then the following process should be adhered to.
Finding and Marking Top-Dead-Centre
At this point, it is best to set Fuelling Mode to OFF in the Injection Driver (Remember to turn it back on later!) so that the injectors are not commanded to fire - this will stop the bores from flooding during the following testing. You can find this option under System>Injection Driver in the entity tree.
With a stable, steady RPM when cranking, and the coil rest states set correctly, you will now be receiving ignition sparks at the plugs - if you are not, recheck your I/O settings, power to the coil & wiring , or try a test mode on the COIL outputs to confirm the hardware is working as expected. (See Section on Output Settings and Testing).
Firstly, it is important to find the TDC (Top Dead Centre) of cylinder one on your engine, and make a suitable mark on the front pulley and engine casing, ideally with tippex, such that you can see externally when the engine is at TDC. Most engines have a marking already, as shown in the image below:
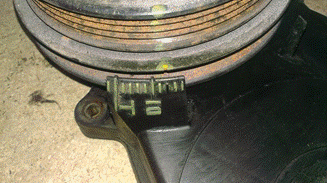
You can clearly see the indent in the pulley, and the ‘10’ mark (meaning when the indent is aligned with this, the engine is at 10 degrees before TDC) and the ‘T’ mark, which when the indent is aligned with this, it is at 0 degrees - i.e, the piston in Cylinder One is at the top of the bore.
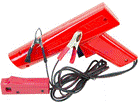
We will then also fit a timing light, such as the one shown below, to cylinder one HT lead - this will then flash when the ECU tells that spark plug to fire, and by looking at the position of the mark on the front pulley in relation to TDC marking, and comparing this to the Ignition Advance readout from the software, we can see if the spark plug is indeed being fired at the time the ECU is commanding it to, and if it is not, we can adjust the ‘Trigger Offset’ number in the Engine Driver to make it correct.
Setting the ECU to Fire in "Fixed Fire Mode"
Because the ECU tries to alter the advance angle (the point at which the ignition spark happens in relation to TDC) dependant on many factors in the map, we need to stop this from happening, and instead, have the ECU fire at a fixed angle of 10* BTDC (Before Top Dead Centre), regardless of these map settings.
To do this, go to the Ignition Driver (System>Ignition Driver) and set Fixed Fire to Yes - REMEMBER you must turn this back to NO after this setup process otherwise the ignition advance will be fixed to 10*!
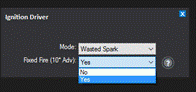
Now, the ignition advance DRO will ALWAYS read 10* (and the engine is always fired at what the ECU believes to be 10*) regardless of the settings in the map, engine speed, environmental corrections, and so on.
On newer versions of Firmware (June 2023 onwards) the fixed fire driver has been updated to allow you to set the angle directly - set Fixed Fire to "Yes" and enter the Angle you wish to compare to your timing mark (eg. 10* or 0* etc). Your ignition timing will then be LOCKED to this angle and it will ignore all other factors such as the ignition table.

Adjusting the Offset Angle
Now, with the engine cranking, asses where the TDC indicator on the pulley is (when illuminated by the timing light) in relation to the factory (or mark made by you) TDC marking on the engine casing. Remember to ensure the timing light offset (if it has a dial etc) is set to ZERO - we should be seeing this spark event happening at 10* Advanced (BTDC).
We will assume, for the sake of argument, we find that the spark is fact happening at 22* BTDC. This means we have an error of 12* over advanced - that is, the ECU is commanding the engine to fire at 10*, but it is in fact firing at 22*, hence the error of 12*.
We will then go into the (System>Engine Driver) , and take 12* from the current Trigger Offset, so in the below example where it is set to 255, we will change it to 243, and press enter (and the outer box will go green to signify the change has been sent to the ECU).

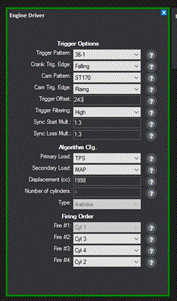
It is them simply a case of checking once again with the timing light, eventually confirming the engine is indeed firing at 10* BTDC on Number One cylinder.
We can then head back over to the Ignition Driver, and change the FIxed Fire mode back to ‘No’, to use the ignition map and functions of the ECU to decide on the ignition angle to use.
Note that an error of a couple of degrees will not be a factor in allowing the engine to run safely at low load on the basemap, and this can be refined later during the tuning process on the rolling road, or while monitoring for knock.